
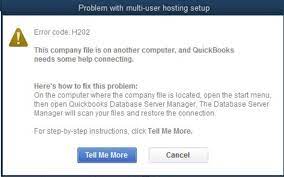
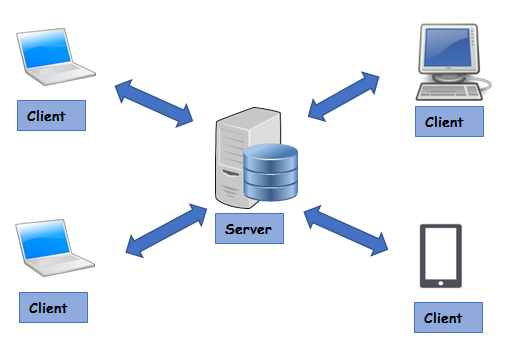
QuickBooks Error H202 mostly occurs when a user tries to switch to multi-user mode to access company file stored on the server computer and the connection in-between is blocked due to some reasons. The message shown is Error Code: H202 “This company file is on another computer, and QuickBooks needs some help connecting.” making the company file inaccessible and hindering the accounting work. Server (Main Computer), Where QuickBooks Company Files are stored and Node (Workstations) which access the company files and information from the Server, constitute a multi-user network. Any glitch in establishing connection with the Company File can lead to this error code.
The Major Causes of QuickBooks Error H202
QuickBooks Error H202 can occur due to the following reasons-
- The server or workstation is configured incorrectly.
- Due to limitations on Windows firewalls or third-party firewalls, QuickBooks can’t access the Company File.
- Faulty DNS settings, including incorrect DNS server addresses or unavailable DNS servers.
- Generally, QuickBooks is unable to connect to other machines on the network because of network configuration issues.
- Failure of internal QuickBooks processes such as QBCFMonitor and QuickBooksDBXX.
- Absence of QuickBooks Database Server Manager on your PC.
- A problem in QuickBooks Database Server Manager.
- Due to damaged or corrupt .ND File
Troubleshoot Techniques for QuickBooks Error H202
1. Use QuickBooks Database Server Manager
Using QuickBooks Database Server Manager is highly recommended to resolve this error code. The correct way to operate QDSM is explained below in steps.

- First, navigate to the Windows Start menu on your server and choose it.
- Enter the term database in the search area.
Click QuickBooks Database Server Manager from the list of results. - Look for the folder containing the company’s files. You may also use Browse to locate this folder.
- Select this folder.
- Look for and click the Start Scan button.
- QBDBSM automatically restores Firewall permissions.
- Allow the scan to complete its work before clicking the Close button.
- You must launch QB on each workstation where the issue arises.
- Navigate to the File menu in QB and choose it.
- Look for and choose Switch to multi-user mode.
- If you can utilize multi-user mode, you have successfully resolved the QuickBooks H202 issue.
- If the error persists, go to the next remedy.
2. Check QuickBooks Services
- The first step is to check that the “QuickBooksDBXX & QBCFMonitor” services are operational and to begin using them.
- Click the “Start” button on Windows.
- Then, to launch the application hit the keys like “Windows + R.”
- In that running dialogue box, type “MSC” and press the “Enter” key.
- In the Service Window, scroll down to see the QuickBooks DBXX service.
- QuickBooksDBXX service is not visible or cannot be anticipated.
- Now, using Database Server Manager, confirm it and have it installed on a server.
- Now “Run” your entire application on a server by first opening QuickBooks and then selecting and verifying whether or not hosting is enabled.
- Double-click on the “QuickBooksDBXX” service.
- Then you’ll be asked to confirm the Startup type and the service status.
- Now, choose the “Recovery” option.
- Open your computer’s menu and restart it, which will restart your “QuickBooksDBXX” service if it fails. Repeat for the second failure.\
- Now press the “Apply” button to save all of your changes.
- Replay the above procedures for the “QBCFMonitor” Service.
- Then, on each workstation, restart your QuickBooks program in multi-user mode.
3. Ping the Assigned Server
- Open the Run window on a workstation that is experiencing QuickBooks error H202.
- Enter CMD in the text area and press the OK button.
- You must now ping your server from your workstation.
- To do this, type ping [servername] and then press the Enter key. Please keep in mind that the above brackets surrounding the server’s name should not be utilized while executing this step.
- Apply the actions outlined above to all workstations that are experiencing the issue.
- If you receive a delayed response or notice a packet loss, it indicates that there is an issue with the network and that it needs to be repaired.
4. Re-configure your Firewall Settings

A firewall might be preventing data flow between QuickBooks and the server. Follow the steps below to set up the server’s firewall settings so that communication between QB and the server is not hampered.
- Configure the firewall to accept exceptions.
- Change the permissions on the firewall and launch QuickBooks on all the workstations.
- Under the File menu, select Switch to multi-user mode.
5. Create a Separate Folder for QB Company Files
- A firewall might be preventing data flow between QuickBooks and the server.
- Create a new folder on the server.
- Change the permissions to allow this new folder and QuickBooks business files to be shared.
- For copying, use the Ctrl and C keys.
- Copy the .qbw file to the new location.
- Open your QuickBooks company file in multi-user mode (QuickBooks error h202 switching to multi-user mode).
- Check to see whether QuickBooks problem H202 appears when you open a QuickBooks company file in multi-user mode.
6. Use Quickbooks Connection Diagnostic Tool
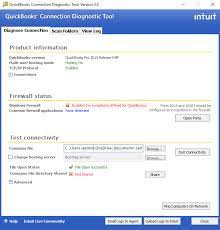
- Install the QuickBooks Connection Diagnostic Tool after downloading it.
- Scan the QuickBooks Company file folder with the tool.
- Take note of the IP address displayed when the tool is launched.
- Enable the ports in the firewall Status column that contain the Open Ports Button.
- Follow the wizard’s instructions all the way to the finish.
- Try to open the file from the PC that is causing Error Coder H202.
Take Away!
With the help of these solutions, you can easily kick out QuickBooks error H202 from your system. We hope that this blog post played a great role in doing that. As a token of appreciation, you can comment down below and let us know.
Also, check out other awesome posts, they will help you out in eradicating different types of QuickBooks errors.
Author Profile

- Jonas Taylor is a financial expert and experienced writer with a focus on finance news, accounting software, and related topics. He has a talent for explaining complex financial concepts in an accessible way and has published high-quality content in various publications. He is dedicated to delivering valuable information to readers, staying up-to-date with financial news and trends, and sharing his expertise with others.
Latest entries
 BlogJuly 8, 2024Introduction to Tax Liens and Deeds
 BlogOctober 30, 2023Exposing the Money Myth: Financing Real Estate Deals
 BlogOctober 30, 2023Real Estate Success: Motivation
 BlogOctober 28, 2023The Santa Claus Rally